Best Instagram Reels Tips and Tricks for 2021
As a creator, we aspire to be one of the best in the business. Producing highly engaging videos that can grab eyeballs and compel onlookers to send a ton of hearts is where the bucks stop. But how do you create attention-grabbing content, and what are the tools required to make pro-level Instagram Reels? Well, we have taken all the aspects into account and included tips that can help boost your fortune on the short video-sharing platform. Now let’s dive in and take a look at the top Instagram Reels tips and tricks in 2021.
1. Find Your Niche and Post Clips Frequently
You don’t want to be a jack of all trades, do you? While there is nothing wrong with being a person who can be good in several departments, you should always strive to be the master of one craft. It is essential if you dream of becoming one of the most loved Instagram Reels creators.
What are you good at? Do you have the dancing skill that can steal the show? Can you attract viewers with your looks and lip-sync craft? Do you have a passion for flaunting a chiseled body and beefed up muscles, or do you have the heart to perform jaw-dropping stunts? All I’m trying to stress is that you need to find the niche you wish to rule and go all out to put your best effort. Remember, when you have only a few seconds to impress, nothing less than a blitzkrieg or admirable reel can garner hearts and likes.
2. Presentation Matters
Before you create a Reel, ask yourself a couple of simple questions. Why may anyone want to watch the clip? And what could be the right pitch for your reel? These couple of questions can help you prepare and keep any oversights at bay, which are common when you go all-in with very little preparation.
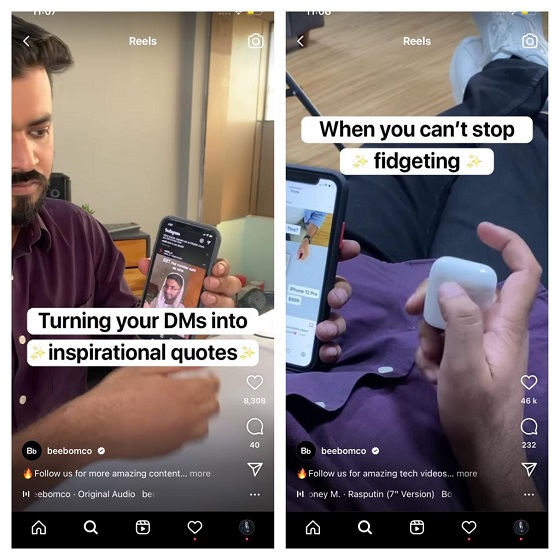
Once you have answered the fundamental questions, craft the presentation with precision. Think about each move and the impact it will leave behind. You can check out one of our cool ‘How did we go from this to that’ Instagram Reel right here. The timing and precision of your moves are important to gravitate users towards your content.
3. 30/60 Seconds is Always Better Than 15 Seconds
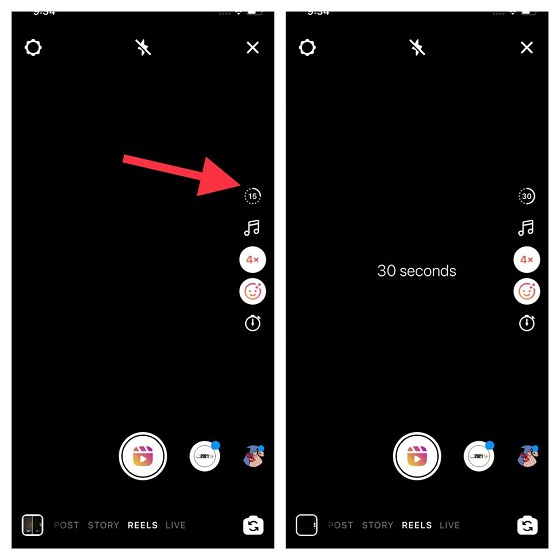
At launch, Instagram Reels allowed users to record only 15 seconds of video. However, when creators asked for a bit more freedom in terms of time, the Facebook-owned video-sharing platform had to double the video recording time. And now, it has bumped the video recording time even further, all the way to 60 seconds.
So, if you are still stuck at the 15 seconds loop or don’t know how to increase the length, let me tell you that switching between 15, 30, or 60 seconds is pretty straightforward. Tap on the tiny circle button (showing 15 seconds by default) at the top of the camera tools to hop between 15, 30, or 60 seconds.
4. Hidden Tool to Adjust Video Length
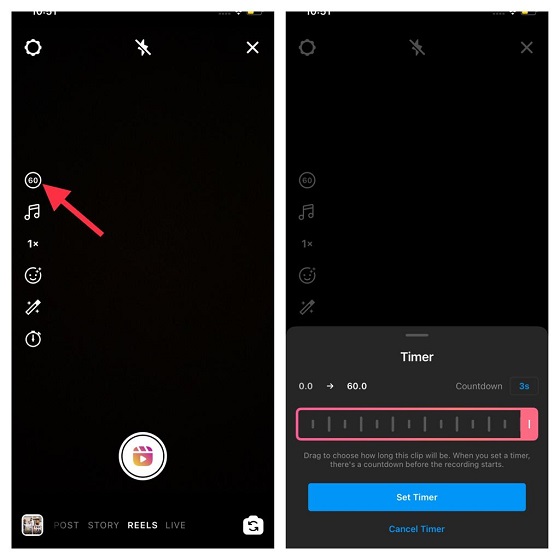
Have you ever wished to adjust the length of your Instagram Reels after recording but don’t know how to do it? It happened to me when I started taking an interest in Reels and wanted to create some funky clips. But just when I was about to look for third-party tools to fine-tune the length of Instagram Reels, I discovered the hidden tool inside the Timer itself.
To get going, tap on the video length button to switch between 15, 30, or 60 seconds. Then, tap on the Timer button. After that, drag the slider to adjust the length of the video. Besides, you can also adjust the countdown before you go ahead and record your clip.
5. Get Your Timing Right
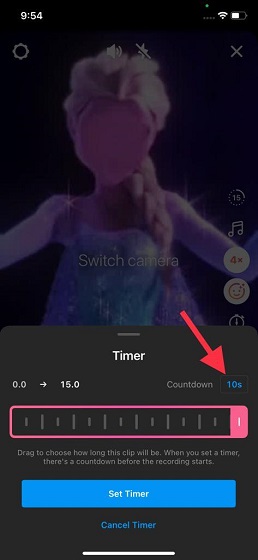
Considering how pivotal timing is for perfecting each move or expression, you should never miss out on any trick to get as close to perfection as you can. Before getting into action, tap on the timer button. After that, tap on the tiny button next to the countdown to switch between 3s and 10s seconds. Next, tap on Set Timer.
6. Never Forget to Align Your Instagram Reels
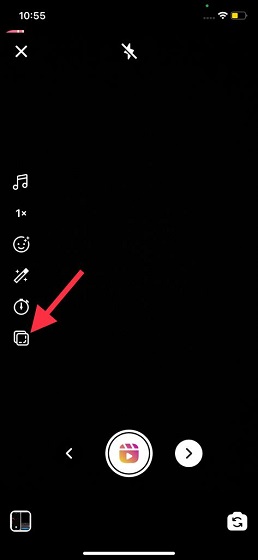
This is the Instagram Reels trick that should stick with your forever. The Reels feature comes with a built-in video alignment tool that you can use to align your clips with ease. Once you have recorded the video, tap on the video alignment button. It gets the job done reliably and without hampering your productivity.
7. Slow Down or Speed Up Your Video
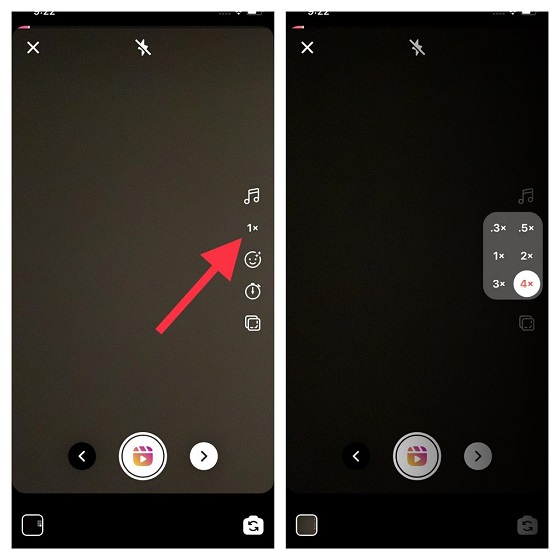
One of my favorite Instagram Reels features is the native speed adjustment tool. Whether you want to slow down your reel or speed it up to make it appear more dramatic, you don’t need to look anywhere else to fine-tune the speed of your video.
Before recording the clip or after you have captured the video, hit the speed button (1x) and select the desired option. While .3x and .5x allow you to slow down your clip, the 1x, 2x, 3x, and 4x let you speed it up.
8. Experiment with Effects & AR Filters
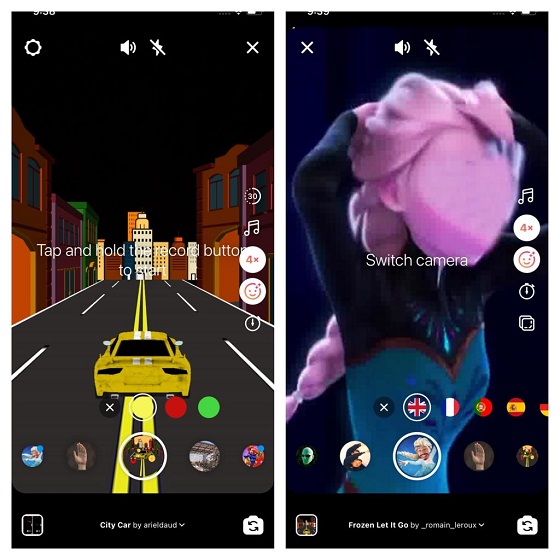
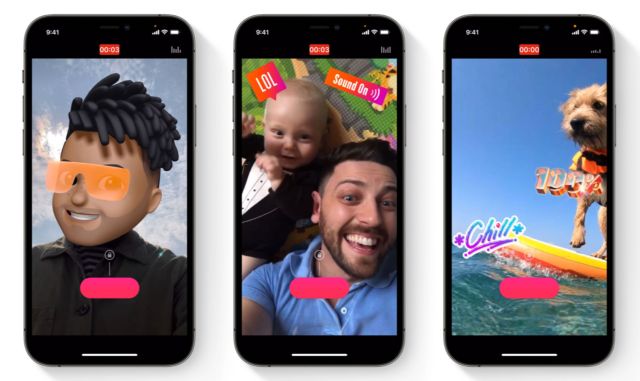
Instagram Reels already boasts a ton of eye-catching effects. And if you think that the number is as good as the last time you strolled into the effects collection, you can’t be more wrong. The video-sharing platform keeps rolling out new effects to let you spice up your video.
So, every time you wish to start or partake in an Instagram Reels trend, dive into the effects collection (tap on the effects button) and try out a myriad of effects until you are pleased.
9. Keep Camera Tools at the Preferred Side
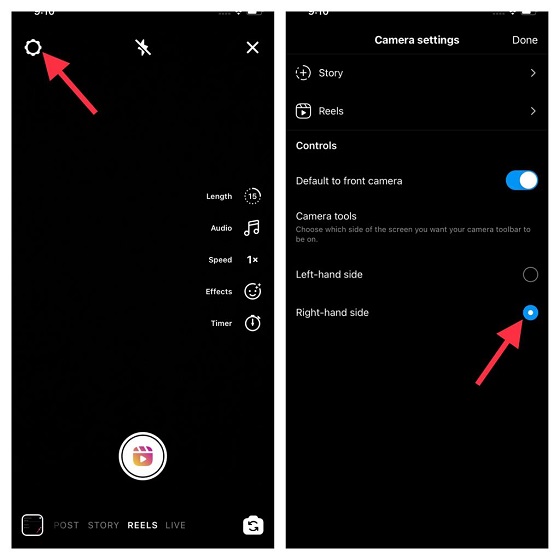
While some folks prefer to keep things on the right-hand side, others like to go with the left-hand side option. It enables them to carry out their work more conveniently. That’s probably the reason why Instagram Reels allow you to choose which side of the screen the camera toolbar should be.
When recording a reel, tap on the settings button at the top left corner of the screen and then choose the left or right-hand option. The creation tools appear on the left by default. I think this is an essential trick for all Instagram Reels creators.
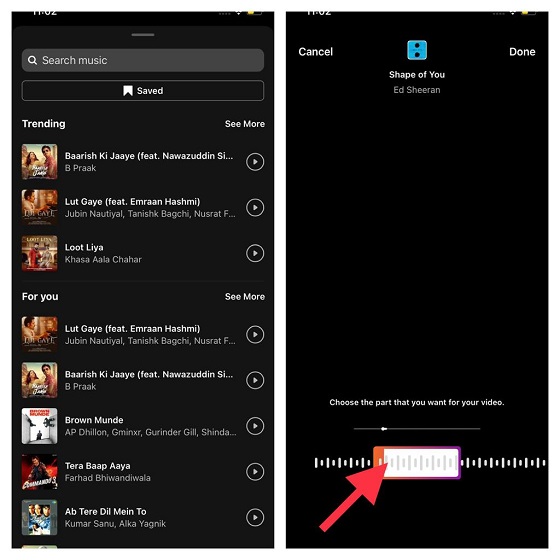
10. Clip Your Music Precisely
Clipping music or selecting the desired part shouldn’t be a hassle when you have a neat tool always ready to do the task for you. Simply, tap on the music button and then search for the songs you want to use. Once you have selected the preferred track, use the slider to choose the desired part of the track. It’s that easy!
11. Keep Your Captions Short and Precise
Captions that are short and sweet catch attention right away, while the ones that cover the entire screen fail to grab attention. The best way to nail Instagram Reels captions is to play with words. And with it, I mean using the caption that can send your message loud and clear at a glance, of course, without sacrificing the style factor.
12. Use Eye-Catching Covers – Best Instagram Reels Trick
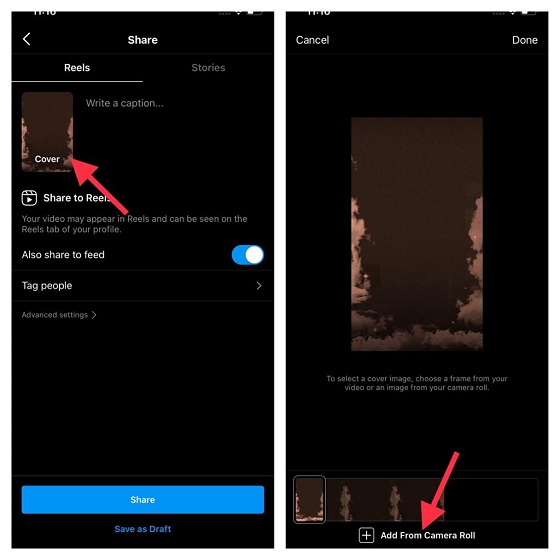
They rightly say, “The first impression is the last impression.” Thus, make sure to design your Instagram Reels cover with precision so that it can best represent your video. Both App Store and Play Store are loaded with a plethora of highly-rated photo editors. However, the ones that have always impressed me are Adobe Lightroom (iOS and Android; Free with in-app purchases), VSCO (iOS and Android; Free with in-app purchases), and Snapseed (iOS and Android). They are feature-rich and come with a wide range of photo editing tools to let you design your Reels cover. So, give them a shot and I’m sure you would soon begin to see the difference.
Changing Instagram Reels cover is easy. Tap on the video with the ‘Caption’ tag (on the sharing screen) and then hit the “Add from Camera Roll” button. After that, select the custom cover.
13. Automatically Save Your Instagram Reels to Your Device
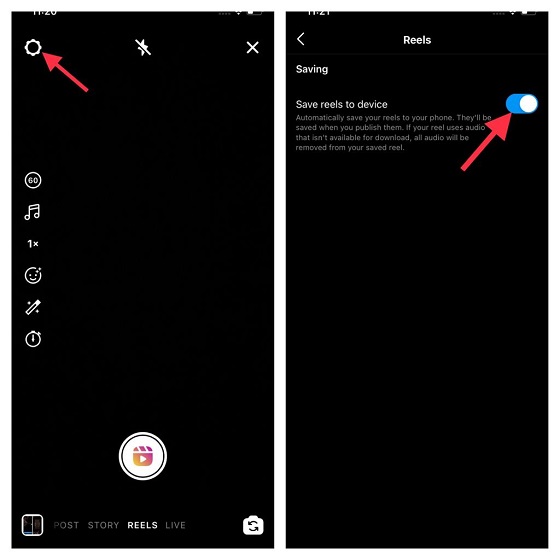
For a keepsake, I prefer to save Instagram Reels on my device. Whenever I wish to go back in time and take a close look at all the clips that I have uploaded on the video-sharing platform, I can explore the collection at my own pace. If you also belong to the same school of thought, follow the steps below:
Tap on the settings icon at the top left corner. After that, tap on Reels. Next, turn on the switch next to Save reels to device.
14. Stay in Sync with Trends, But As a Trendsetter
While it’s always recommended to hop onto the latest trend to stay ahead of the curve, you must always add something new to the table. Think of adding quirky laughter into the mix or a peculiar expression with a wry smile or the childish face that compels onlookers to take notice.
Whenever a piece of music or style tops the chart, many folks run after it so much that it begins to look redundant. While the ones who grabbed the trend early on with immaculate act run away with the hearts, mere followers hardly get much appreciation. The trick is either be the first (or among the first batch) or add something different to the concept to make it appear more striking.
15. Use Third-party Video Editing Software
Despite having a stunning lip-syncing or acting skill, your reel won’t get the desired appreciation unless you’ve edited it beautifully. Without undermining the plethora of effects and stickers that Reels come loaded with, I recommend you to make your clip using pro video editors.
Believe me, video editing had never been so easy-going before. Of course, it does take a while to master all the tricks of the trade, but there are quite a few super handy video editors that can let you adorn your clips instantly. And that too without being embroiled in a lengthy learning curve or tedious process. If you are willing to get started on the right note, check out our lineup of the best Instagram Reels video editors.
16. Buy Lights for Your Instagram Reels Shoots
Most of the LED lights work with the companion app on Android and iOS to let you customize colors based on the theme of the video. So, whether you want to brighten up the colors or wish to go vibrant, you can do it all and more with utmost ease.
17. Never Settle with the Native Music Library
Music is the crux of any video, more so for the clips that have only a few seconds to leave a lasting impression. So, why settle with the songs that don’t seem to gel along with your video? Agreed, Instagram Reels come with a boatload of tracks to choose from, and most of the time, you may not have to look beyond them.
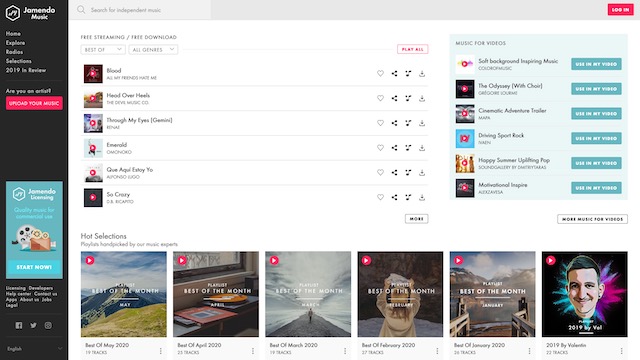
But if you fully rely on Instagram Reels’ built-in music library, chances are pretty high that you might soon find the library insufficient for your out-of-the-box clips. And that’s when you would need to look beyond. But bother not, there are several reliable sites that offer legal and free music. So, the next time you want to use some unique music in your video, do keep this Instagram Reels trick in mind.
18. Give A Personal Touch to the Audio
It’s always better to give your personal touch to the music, which not only sets your content apart but also showcases your creative aspect. As someone who has a penchant for sharing fun-loving videos, I like to fine-tune audio and also add voiceover (on some occasions) to make it different.
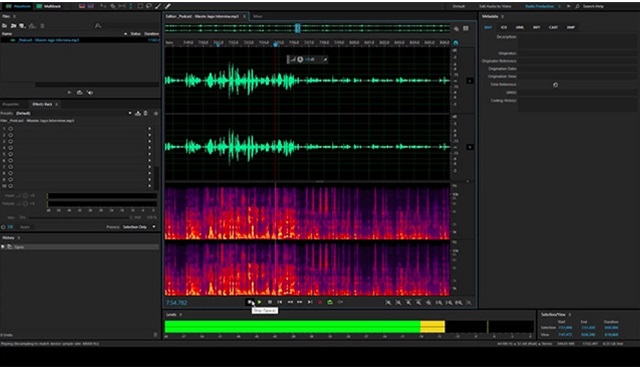
Adobe Audition, Logic Pro X, and Audacity are undoubtedly the best audio editors that you can use to customize your audio proficiently. However, if you want to go for easy-to-use free audio editors, I recommend you try out Presonus Studio One and Ardour. Head over to our extensive roundup of the best audio editing softwares for more information.
19. Use Audio from Other Instagram Reels
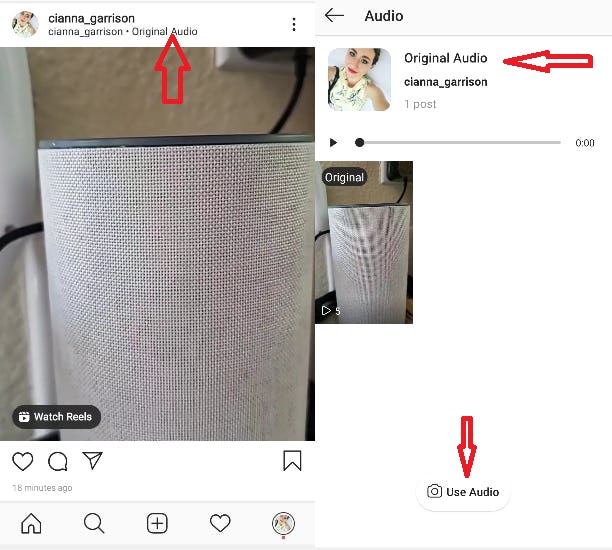
Have you ever run into a cool Instagram Reel and wished you could use that audio for your own Reel? Turns out, the video-sharing platform provides an official way to use original audio from other Reels. To get it done, open the Reel whose audio you want to use. Then, tap on the “Original Audio” option located at the top of the video.
On the next screen, tap on the Use Audio button at the bottom. Next, you will be directed to the Reels camera, where you can start recording with the original audio. Do note that the original audio is always credited to the original creator.
20. Remix Instagram Reels to Create Exciting Clips
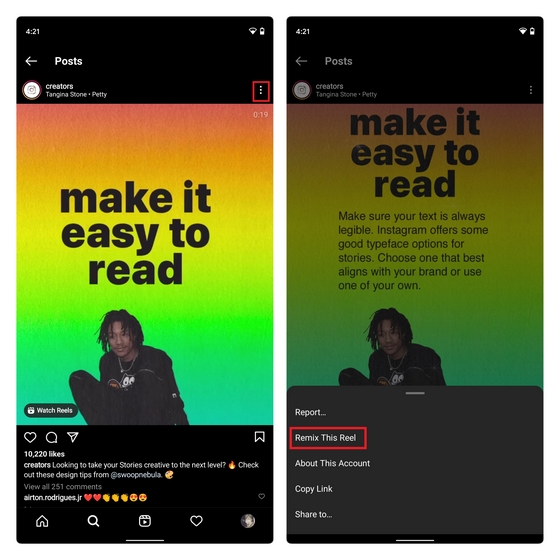
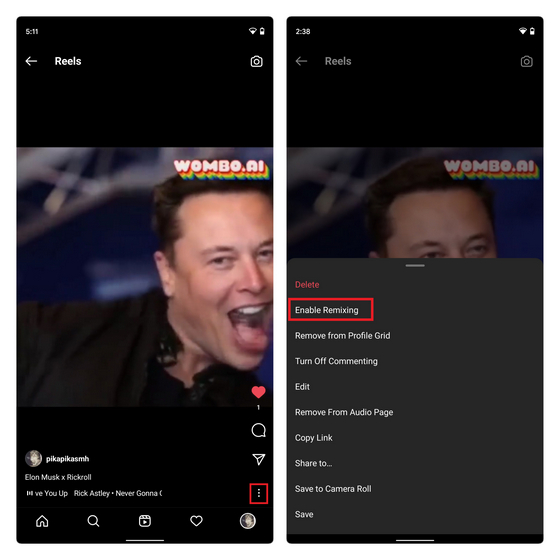
Recently, Instagram introduced a long-awaited feature called “Remix” that is similar to TikTok’s Duet. Going by the trend, remixed videos have been getting a lot of attention on the video-sharing platform. Whether you want to parody existing reels or wish to make a match with a popular video, Remix can have a role to play. So, be sure to incorporate this Instagram Reels trick into your arsenal to widen your exposure. Bear in mind that the Remix feature is enabled only for new videos by default. So, if you want to go all new, you will need to manually enable it for your old reels. To get started with Instagram Reels, launch Instagram and then open a Reels video. After that, tap on the three dots menu and select Remix This Reel. Now, go ahead and either record a new response video or choose one from your camera roll. As usual, you have effects and built-in editing tools to adorn your reel. When you are happy with your creativity, add a suitable caption and share it.
If you want to enable Remix for old videos, tap on the three dots menu at the bottom right corner and choose Enable Remix option. To find out more about Remix and how it works, head over to our detailed guide on how to use Instagram Remix Reels feature.
Super Handy Instagram Reels Tips and Tricks to Stay Ahead in 2021 There you go! So, these are some pro Instagram Reels tips and tricks that can keep you ahead of the curve. Now that you have got a good hang of short video creation, you can make the most of these tips to excel in all the pivotal aspects. Remember, it’s nothing but a genuine and engaging piece of content that can make you the star on Instagram Reels. So, go after it by staying focused and improving your skillset slowly but steadily. Do you find any tips and tricks missing in the roundup? If yes, be sure to let me know in the comments section below.


