Over 40 Super Cool iPhone Tips and Tricks You Should Try in 2022
As almost every app has got a handful of hidden tricks, it requires some digging to unravel them all. While some iPhone hacks are merely out of sight, others require a bit of workaround. Keeping productivity, security/privacy, and customization in mind, I have made sure to line up a variety of tricks. So, it’s got way more than just discovering a few nifty hacks. With that in mind, let’s get on with the roundup!
Hidden iPhone Tips
1. Use Custom App Icons
What better way to kickstart this lineup than talk about changing the app icons to your heart’s liking? Yeah, you read that right! Custom app icons can go a long way in letting you customize your home screen.
After a long wait, iOS has eventually opened the gate for customization by introducing home screen widgets and also offering the freedom to fine-tune app icons. If you are wondering that you may have to spend some bucks to buy the icon packs, let me tell you that there are some cool ideas that can let you design your iOS 14 home screen like a pro – without having to dole out any money.
There are quite a few third-party apps like App Icon Changer (free, $9.99/month) and Launch Center Pro (free, offers in-app purchases) that let you create custom app icons. The process of creating custom app icons is quite simple. All you have to do is to use one of these third-party apps to design your favorite app icons and then save them to your camera roll. After that, use the Shortcuts app to add the custom app icons on the home screen.
2. Change Wallpaper Automatically
I’m a big fan of eye-catching wallpapers and always use them to deck up the home/lock screen. No matter how nice a wallpaper is, I don’t let it stay around for more than a day or two. But instead of setting a wallpaper manually by digging into the Photos/Settings app, I prefer to use a trick to change wallpaper automatically. And that too with just a tap on the home screen. Sounds intriguing, doesn’t it?
If you also find this hack worth having a go, create an album of all the wallpapers that you want to use. Then, download the wallpaper shortcut to your shortcut library. Next, set up the shortcut to access your custom photo album. After that, you can just tap on the shortcut icon to change the wallpaper automatically on your device. Take a peek at the GIF below!
3. Launch Your Favorite App Using Back Tap Gesture
Among all the cool iOS 14 features that I have tried, Back Tap is undoubtedly one of my top picks. What makes it so cool is the ability to let you not only activate a wide range of system features like Siri, app switcher, Reachability, Spotlight, and more but also launch your favorite apps with Back Tap.
With the help of the Shortcuts app, you can choose the app that you want to launch with the double/triple-tap gesture. Once that’s done, you can head over to the Settings app -> Accessibility -> Touch -> Back Tap -> Double Tap/Triple Tap and then select the shortcut. After that, all you have to do to open that app is just tap on the back of your iPhone and you are good to go!
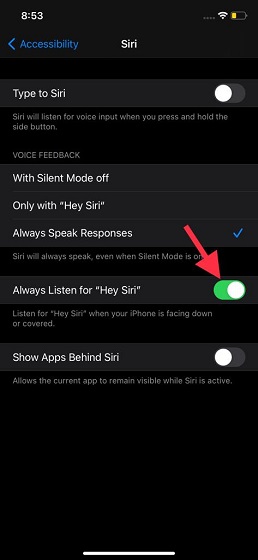
4. Listen for Hey Siri Even When iPhone is Facing Down or Covered
When iPhone is facing down or covered, Hey Siri doesn’t get activated. It’s designed to let you prevent the virtual assistant from being unnecessarily invoked with ease. But what if you have accidentally put your iOS device face down or covered and are trying to invoke the virtual assistant to turn on the flashlight during midnight? Wouldn’t you find this feature annoying? Yes, you may most probably want to disable this feature. Go to the Settings app on your device -> Accessibility -> Siri. Now, turn on the switch right next to “Always Listen for Hey Siri.”
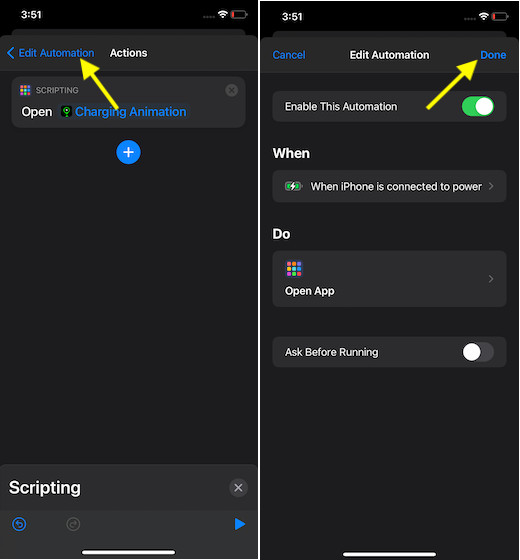
5. Set Custom Charging Animation on iPhone
This one is for the folks who never seem to get enough of customization. If that’s you, the idea of setting a stunning charging animation on the iPhone would instantly bring a smile to you. Bear in mind this hack works in sync with the Shortcuts app and also requires you to download a charging animation app.
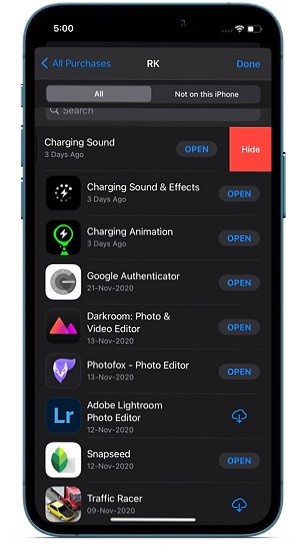
My Top Three Charging Animation Apps Are:
Charging Sounds and Effects: (free)Charging Animation (free)Charging Sound: (free)
Once you have installed your favorite charging animation app, select the desired charging animation and then use the Shortcuts app to set it up with this guide.
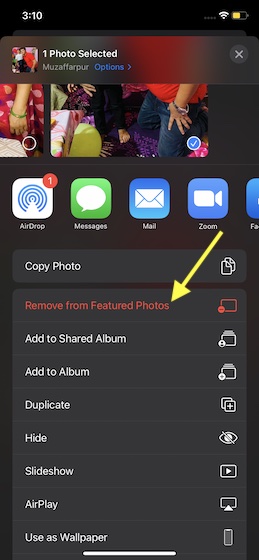
6. Hide Specific Image from Photo Widget
Photo Widget is among the coolest home screen widgets that Apple has introduced in iOS 14. While I have liked using it on my iPhone to keep a track of fond memories right from the home screen, the lack of better control over which photos to show and which ones to keep away has irked me a lot. Thankfully, there is a trick that works reliably in hiding specific images from the Photo widget. Simply tap on the image you don’t want to see in the photo widget. After that, tap on the Share button and choose Remove from Featured Photos to keep that image away from the widget.
7. Hide Apps on Your iPhone
Some personal apps like dating and expense tracking are better-kept secret. So, if you no longer want anyone to bump into your private apps, make sure to keep them under the shield. iOS offers multiple ways to hide apps. For instance, you can use folders to keep apps out of sight, take advantage of Screen Time to conceal apps (Settings app -> Screen Time -> Content & Privacy Restrictions -> Allowed Apps), and even use a killer hack to put all of your purchased apps under the wraps in the App Store. To find out more about how these tricks work, navigate to our detailed guide about hiding iPhone apps.
8. Hide the Hidden Album
Though iOS has offered a way to hide specific images and videos for a long time, anyone could easily find out the Hidden Album due to the lack of a strong shield. However, that’s not the case anymore as iOS 14 has offered a better way to hide the Hidden Album. So, if you no longer want all of your secret photos to be easily discovered by anyone, make sure to take advantage of this new feature.
Open Settings app on your iPhone or iPad -> Photos app and then turn off the toggle for Hidden Album. Going forward, this album will no longer appear in the Albums tab of the Photos app.
If you wish to go for an even stronger shield, choose one of these best photo vault apps for iPhone and iPad to store and manage your images with better control.
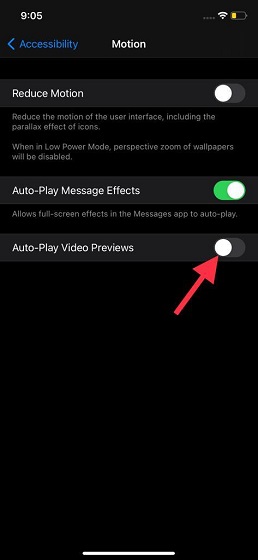
9. Disable Safari Auto-Play Videos
Auto-play videos tend to not only distract you but also slow down your browsing speed. Not just that, if you fail to take control of the auto-play videos, they can eat into a ton of battery and also gobble up plenty of mobile data. So, make sure to stop them from playing automatically.
The option to disable Safari auto-play videos is slightly under the carpet. Yeah, you got that right! It is neither located inside the Safari app nor found inside Safari settings. Now, before you start scratching your head, let me tell you that it is available inside the Accessibility setting.
Head over to Settings app -> Accessibility -> Motion. Now, turn off the toggle right next to Auto-Play Video Previews.
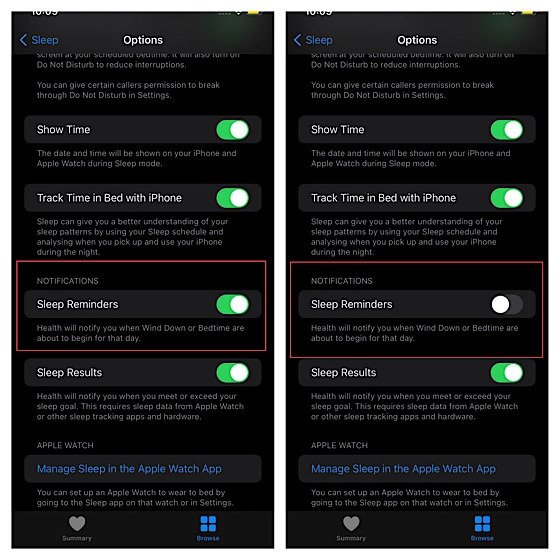
10. Turn off/on Bedtime/Sleep Reminders
If you have upgraded to iOS 14 and are using the newly launched Sleep Tracking feature, you may have discovered that the familiar Bedtime tab is no longer located in the Clock app. So, how do you turn off the bedtime reminders if you don’t need them anymore? Well, before the sheer confusion strikes your mind, let me tell you that it has now gone deep inside the Health app.
Navigate to the Health app on your device -> Browse tab -> Sleep -> Options. Now, turn off the switch for Sleep Reminders.
11. Disable iMessage Auto-Play Effects
While I’m very fond of iMessage effects, I make sure to prevent them from playing automatically. Especially when my iPhone faces battery drain issues or preserving battery life matters more to me than playing the text effects automatically.
If you also belong to the same school of thought, go to Settings app -> Accessibility -> Motion. Now, turn off the switch right next to Auto-Play Message Effects.
For a simplified experience, it would be better if Apple put this setting either inside the Messages app itself or its Settings. Until that happens, make sure to remember this path to take control of the auto-playing iMessage effects.
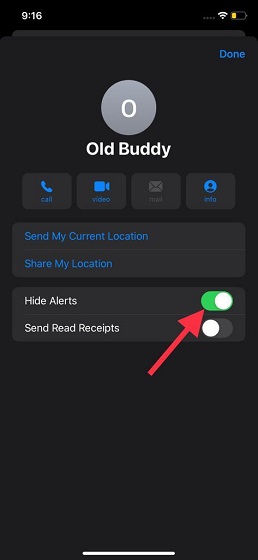
12. Hide Alerts from Specific Chat
There are some conversation threads that tend to keep bombarding you with random alerts. If you no longer want to let them destroy your peace, you can hide their alerts. iMessage offers you the flexibility to conceal alerts per-chat-basis. Thus, you can enable/disable a conversation thread’s notification depending on your needs.
Navigate to the Messages app on your iPhone or iPad -> conversation thread -> name -> “i” button. Next, turn on the toggle right next to Hide Alerts.
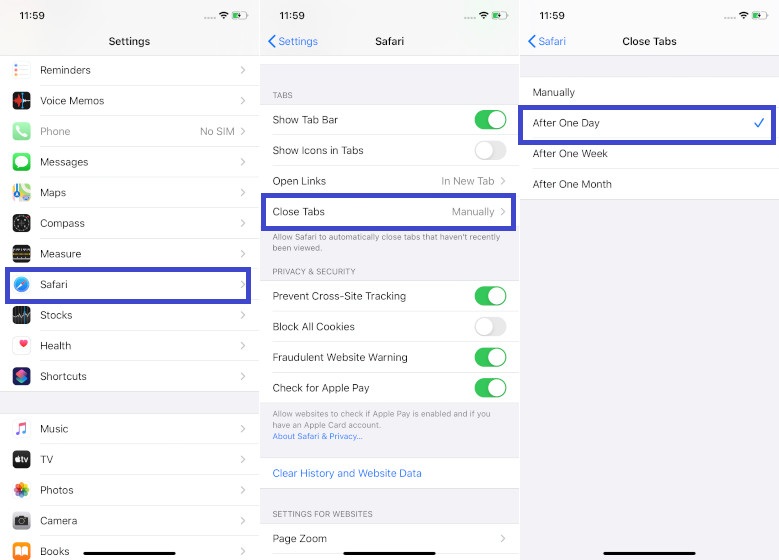
13. Automatically Close Safari Tabs
I don’t know about you but I often forget to close Safari tabs. Hence, they remain open for days and even months in some cases. Though Safari does offer a quick way to close tabs manually (touch and hold the tabs icon and choose the Close All Tabs option), it doesn’t always stay in the mind. That’s why I prefer to go with the automatic closing of the tabs.
If you are in a similar boat, go to the Settings app -> Safari -> Close Tabs. Now, choose the preferred option like After One Day, After One Week, or After One Month to automatically close the tabs after the stipulated time.
If you want to discover more handy Safari tricks like customizing website settings, fine-tuning your favorites, requesting desktop sites, and even customize the download manager, head over to our detailed guide.
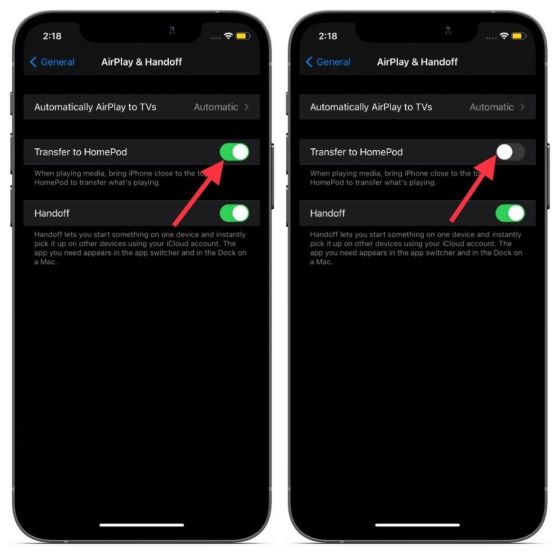
14. Disable HomePod mini Proximity Notifications and Vibrations
With iOS 14.4, Apple has introduced a new feature that provides haptic feedback and the HomePod mini controls pop up on the screen when the iPhone is near the smart speaker in order to simplify the media transfer functionality. While this is a very helpful feature as it makes the media transfer functionality a tad straightforward, the repeated haptic feedback along with the popup of the media controls can turn out to be rather irritating.
If that’s the case, navigate to the Settings app -> General -> AirPlay & Handoff and then turn off the toggle for “Transfer to HomePod”.
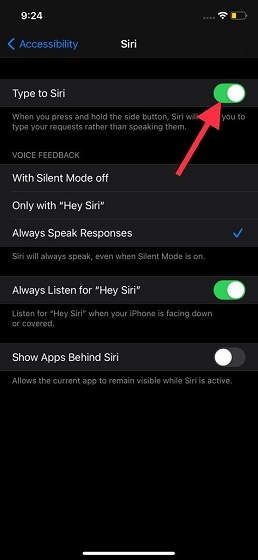
15. Enable Type to Siri
Imagine you are in a public place and suddenly something comes to your mind and you wish to take the help of Siri to get your queries solved immediately. Would you feel comfortable activating Siri and asking it to solve your queries at that place? Most probably, you wouldn’t. Well, this is where Type to Siri comes into play.
Navigate to the Settings app on your device -> Accessibility -> Siri. Now, turn on the switch right next to Type to Siri. From now onwards, you can type your queries while interacting with the virtual assistant.
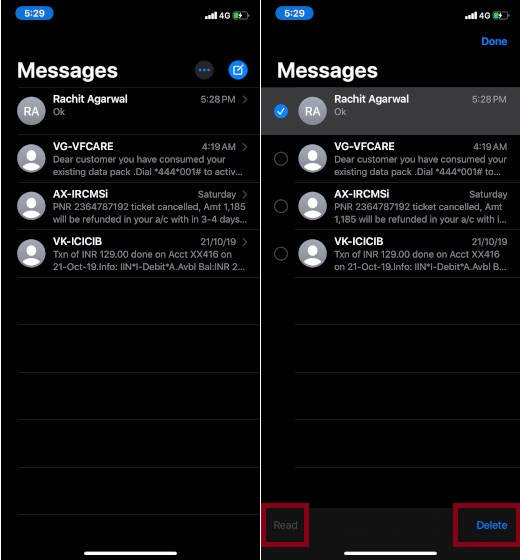
16. Manage Messages Using Super Handy Two-Finger Gesture
Managing messages doesn’t have to be a tedious affair. Thanks to a super handy two-finger gesture, you can manage your messages with ease. So, the next time you find the cluster of messages demanding a bit of neat management, make sure to use this feature.
Open the Messages app on your iOS device. After that, tap on any conversation thread with the two-finger tap gesture to select it. To select more conversation threads, use the two-finger swipe up/down gesture. Once you have selected the conversation threads, you can mark them as read and even delete them all.
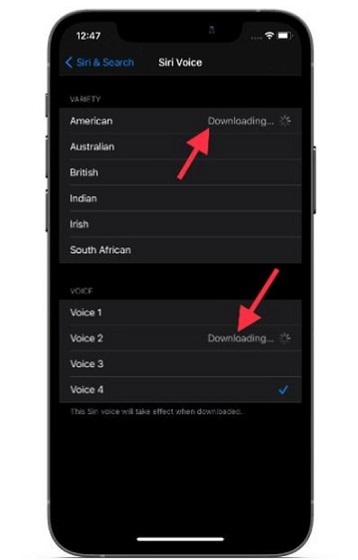
17. Use New Siri Voices
With iOS 14.5, Apple has released two new Siri voices to enhance the natural sound quality of the virtual assistant. As of now, the new Siri voices support only American English. However, they are expected to support more languages in the future. Navigate to the Settings app on your device -> Siri & Search. Now, ensure that the English United States is selected. Then, tap on Siri Voices and then choose the preferred Siri voice located under the Voices section.
Voice 1: Old male voiceVoice 2: New female voiceVoice 3: New male voice Voice 4: Old female voice
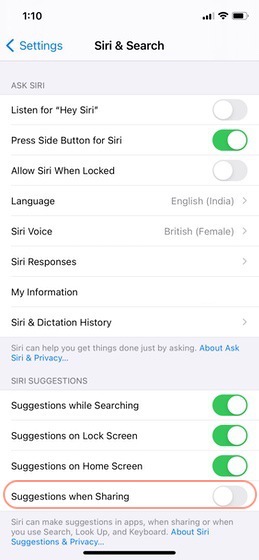
18. Remove Specific/All Contact Suggestions from Share Sheet
Siri provides contact suggestions in the iOS Share Sheet to speed up the sharing process. For instance, if you frequently communicate with a person using iMessage, Siri will show up the contact in the Share Sheet so that you can quickly share messages. While this feature is pretty helpful, some of you might want to hide contact suggestions due to privacy concerns.
If that’s you, open the Settings app on your device -> Siri & Search. Now, turn off the toggle right next to Suggestions when Sharing. It will completely remove all the contact suggestions from the share sheet.
If you want to remove specific suggestions, simply tap on the suggested contact and then choose “Suggest Less”.
19. Show Real-Time Transcription of Your Speech
Personally, I prefer to have the real-time transcription of the speech onscreen while interacting with Siri. It slightly helps improve the interaction with the personal assistant. Unfortunately, iOS 14 keeps the transcription of speech hidden by default. However, you can choose to show it by going to the Settings app on your device -> Siri & Search -> Siri Responses. Then, turn on the toggle right next to Always Show Speech. It’s worth mentioning that you can also show/hide Siri captions depending on your needs. To do so, turn on the toggle for Always Show Siri Captions.
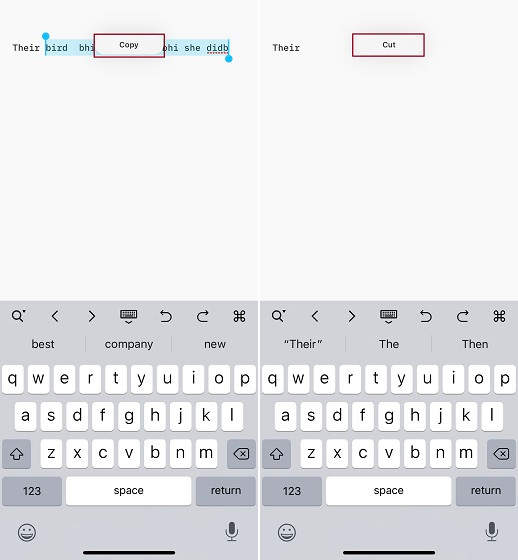
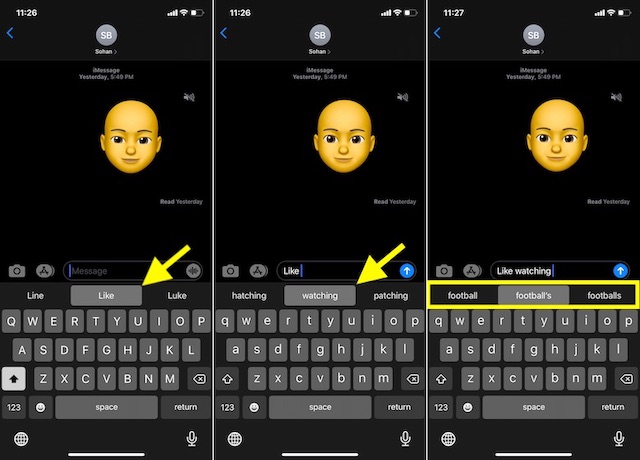
20. Cut, Copy, and Paste Using Three Finger Gesture
The three-finger gesture makes cut, copy, and paste incredibly straightforward. After you have selected your text, pinch with three fingers to copy it. Then, repeat the copy gesture twice to cut it (pinch with three fingers twice). And if you wish to paste the text, all you need to do is just place three fingers on the screen and spread them apart. Pretty handy, isn’t it?
The undo/redo gesture is just as smooth. Simply, swipe left with three fingers to undo anything. If you want to redo, swipe right with three fingers. Alternately, you can also double-tap with three fingers to undo/redo any action.
21. Get the Most Out of One-Handed Keyboard
The one-handed keyboard is my go-to pick whenever I prefer to type using my thumb. And I’m sure you would also fall in love with it after giving it a shot a few times. To get started, open the Messages app on your iPhone and then touch and hold the tiny globe icon. After that, choose the left or right keyboard. Then, start typing using your thumb to type comfortably. Once you have used the one-handed keyboard on your iOS device, touch and hold the globe icon again and choose the keyboard icon that is in the middle.
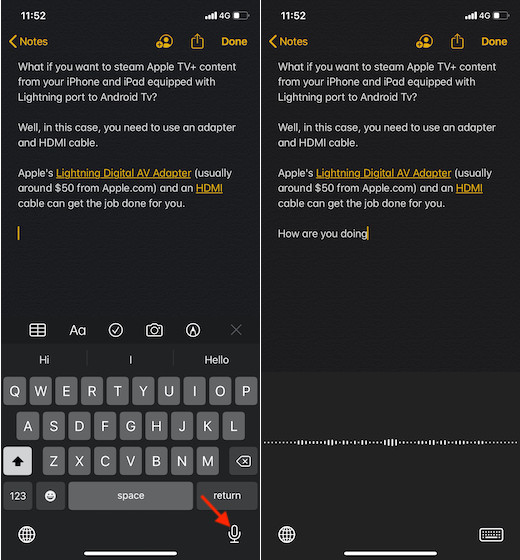
22. Use Dictation to Type Faster
Times when I don’t feel comfortable typing with my fingers, I go for Dictation. It has vastly improved and works quite efficiently in dictating text. So, if you want to get the most out of iOS, you should never give it a miss.
To get going, open the Settings app on your device -> Keyboard. Next, turn on the toggle for Enable Dictation. After that, bring up the QuickType keyboard (stock keyboard) and then tap on the tiny microphone icon to dictate text.
While dictating text, you can say the punctuation or formatting to enter text with precision. For instance, if you say, “Dear Lucky comma the gift has arrived exclamation mark,” iOS will type it as “Dear Lucky, the gift has arrived!”
23. Speed Up Typing Using Swipe-to-Type Feature
QuickPath aka swipe-to-type feature makes typing faster and more convenient. Of course, it does take some time to get used to the swipe-to-type gesture but once you have got it under your radar, you will always prefer to swipe instead of tapping on keys. To get going, bring up the keyboard inside your favorite app and then glide your finger from one letter to the other on the keyboard. For instance, if you wish to type ” Awesome,” simply swipe your finger on “A” “W” “E” “S” “O” “M” “E” letters. The keyboard app will automatically enter the word and give space when you start typing another word.
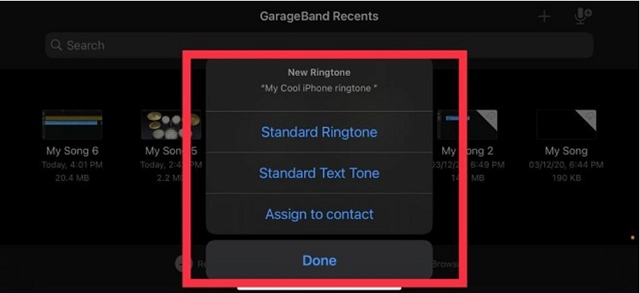
24. Use Any Song/Voice Memos As iPhone Ringtone
Setting any song as a ringtone on iPhone has long been a pain point. However, there is a handy workaround that can let you set any song as your iPhone ringtone without iTunes or PC. Besides, you can also choose to set a voice memo as the ringtone of your device. So, if you are looking for ways to amp up the personalization game, you shouldn’t fail to give it a chance.
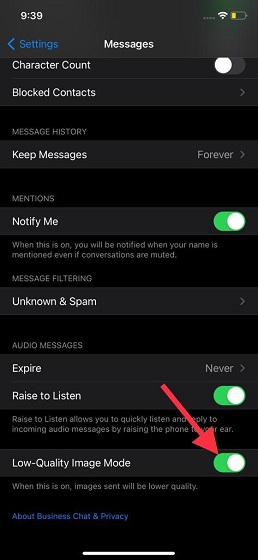
25. Send Low-Quality Images
Though there is no denying the fact that sharing high-quality images is a pleasing experience, it can gobble up plenty of mobile data and might even turn out to be one of the key culprits behind the unexpected battery consumption of your device. So, if you don’t mind lowering the quality of the images while sharing, this hidden iPhone feature can serve you well.
Open Settings app on your iOS device -> Messages. Now, turn on the toggle right next to Low-Quality Image Mode.
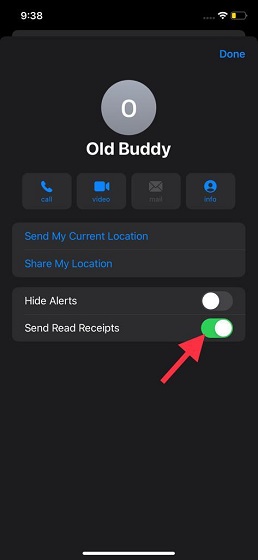
26. Enable/Disable Read Receipts for Individual iMessage Conversation Threads
Let’s face it! Read Receipts has got both upsides and downsides. That’s why I always call it a double-edged sword. On one hand, it helps you find out whether or not the receiver has read your message, on the other hand, it exposes your privacy. But the good thing is iMessage offers you the flexibility to turn it on/off as per your needs. Launch the Messages app on your iPhone or iPad -> conversation thread -> name -> “i” button. Now, turn on/off the toggle for Read Receipts depending on your convenience.
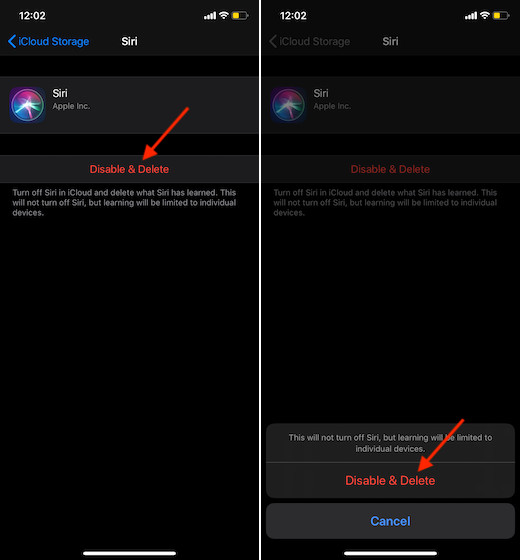
27. Turn off Siri in iCloud and Delete What Siri Has Learned
Siri keeps a tab on your usage to provide a fully personalized experience across the Apple ecosystem. Though there is nothing wrong with it, some of you may want to take control of this learning or limit it to a specific device. Besides, some folks may even want to turn off Siri in iCloud and delete what she has learned.
Head over to Settings app -> Your profile -> iCloud. Now, turn off the switch right next to Siri. After that, tap on Manage Storage -> Siri. Finally, tap on Disable & Delete.
If you want to further enhance your privacy, navigate to the Settings app -> Siri & Search -> Siri & Dictation History and get rid of all the interactions currently associated with this iPhone from Apple servers.
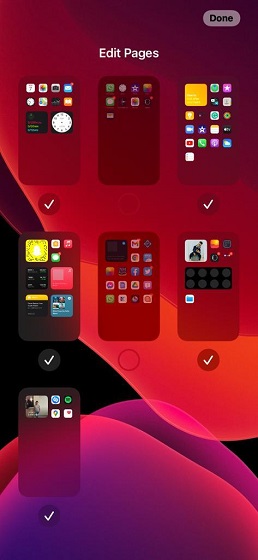
28. Hide/Show Home Screen Pages
Finally, iOS has brought a better way to deal with the unwanted home screen pages or hide some most personal ones. Besides, it can also have a key role to play to keep the home screen uncluttered. Touch and hold an empty part of the screen and then tap on the horizontal dots at the bottom. After that, deselect the home screen pages that you want to hide from the prying eyes. In the end, make sure to tap on Done at the top right corner to finish. If you ever wanted to bring them back, follow the same steps and then select the pages you would like to show on the home screen.
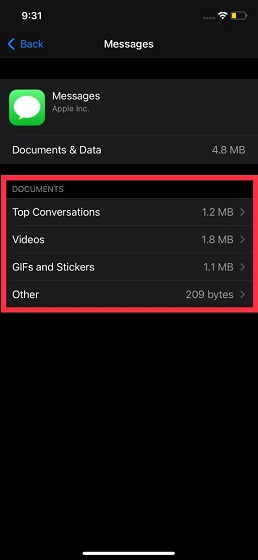
29. Declutter the Messages App
Redundant attachments and chats need to be deleted frequently to ensure they don’t pile up to become problematic. Fortunately, iOS provides a neat storage management feature to let you keep a track of the storage-hogging attachments, videos, GIF, stickers, and more and everything that may clutter the app. Thus, you can keep easily keep the stock messaging app decluttered.
Go to Settings app on your iPhone/iPad -> General –> iPhone/iPad Storage -> Messages. Now, head into the respective categories like Videos, GIF/Stickers, Top Conversation, and then tap on the Edit button. After that, select the items you no longer want to keep and delete them all at once.
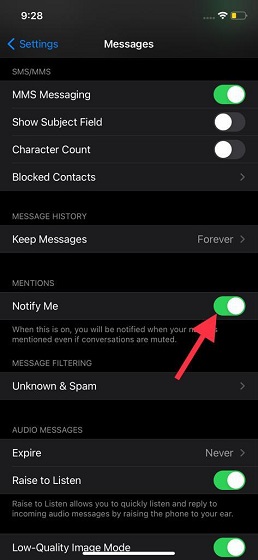
30. Enable iMessage Mentions
“Mentions” is pretty helpful as it notifies you whenever your name is mentioned even if you have muted the conversation. So, if you don’t want to miss out on any important message, make sure to enable this newly added feature.
To do so, go to the Settings app on your iPhone/iPad -> Messages and then ensure that the toggle for Notify Me is enabled. Going forward, you will get the notification whenever your name is mentioned irrespective of whether you have muted the conversation or not.
12 Nifty iOS Tricks You Should Know
In this section, I have mostly covered the tricks that are a little out-of-sight. Thus, many of us fail to take note of them. Considering how user-friendly they are, you shouldn’t let them go.
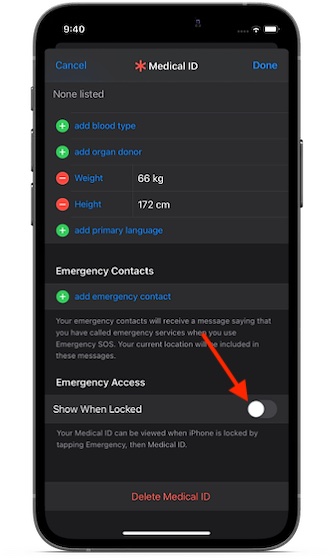
1. Hide Medical ID from Lock Screen
There is a valid reason why iOS allows the Medical ID to be accessible right from the lock screen. But if you want to restrict its access, go to Settings app -> Health -> Medical ID -> Edit. Now, disable the toggle for Show When Locked and then tap on Done at the top right corner to finish.
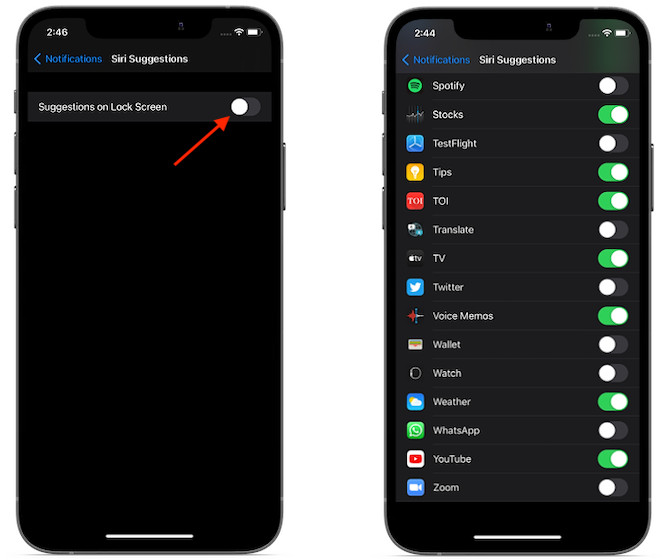
2. Hide Siri Suggestions from Lock Screen
While Siri Suggestions on the lock screen are quite helpful, they also expose privacy. To keep them away, go to Settings app -> Notifications -> Siri Suggestions and then turn off the toggle right next to Suggestions on Lock Screen.
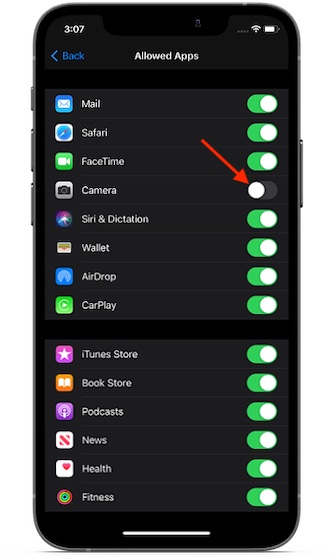
3. Disable/Restrict camera on Lock Screen
When you wish to get started with shooting, the quick access to the Camera app right from the lock screen comes in handy. But if you want to restrict its access from the lock screen to prevent anyone from using it without your permission, head over to Settings app -> Screen Time -> Content & Privacy Restrictions. Now, ensure that the switch for Content & Privacy Restrictions is on. Then, tap on Allowed Apps and disable the switch right next to Camera.
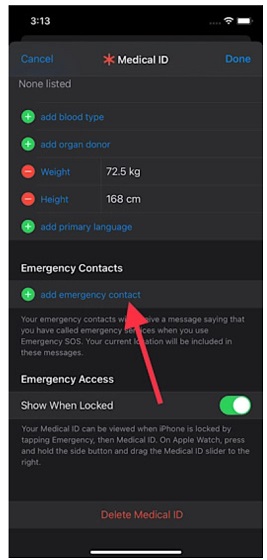
4. Add Trusted Contacts to Health App
iOS lets you add trusted contacts to the Health app so that your dear ones can reach out to you for immediate help during an emergency. Go to Health app -> your profile -> Medical ID -> Edit -> scroll down to the Emergency Contacts section and choose the add emergency contact option. Then, do the needful.
5. Enable Real-Time Measurement of Headphone Audio Level
With the introduction of iOS 14, Apple has further enhanced the already-impressive Hearing Health by adding the ability to measure volume levels of headphone audio in real-time and automatically reduce it. So, if you want to protect your hearing, navigate to the Settings -> Sounds & Haptics -> Reduce Loud Sounds. Next, turn on the toggle for Reduce Loud Sounds. Then, use the slider to perfectly fine-tune the decibel level.
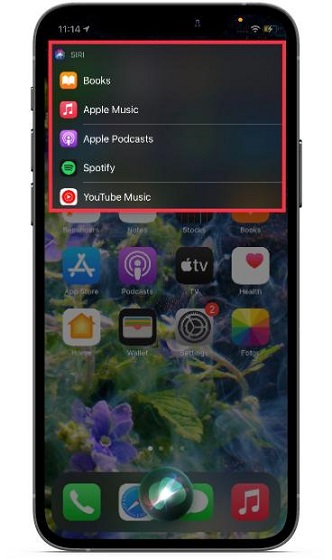
6. Change Default Music App
In What could be great news for the folks who want to have the freedom to choose default apps on iPhone, iOS 14.5 has introduced a way to change default music app. However, the option is a bit covered as it requires you to use Siri to choose your music app as the go-to option.
7. Set Gmail or Outlook As Default Email App
With iOS 14/iPadOS 14, you can set Gmail/Outlook as default; or for that matter any supported email app as the default option. Go to Settings app -> Gmail/Outlook -> Default Mail app and then select the desired app.
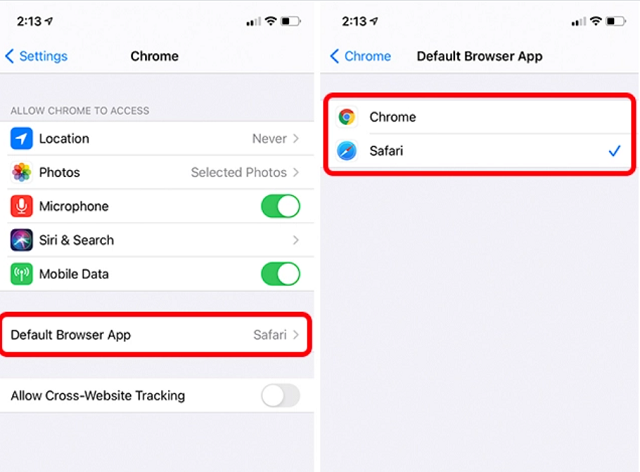
8. Set Chrome/Firefox As Default Browser App
iOS 14/iPadOS 14 also lets you set third-party browsers like Chrome and Firefox as the default options. Navigate to Settings app -> Chrome/Firefox -> Default Browser App and then choose the preferred app.
9. Pin/Unpin Imessage Chats
Finally, you can pin your iMessage chats in iOS 14 or later to access some of your favorites with ease. Simply, swipe towards the right from the left edge of the screen to reveal the pin button. Or touch and hold a chat and then choose Pin in the popup menu. To edit your pins, tap on the three dots at the top right and choose Edit Pins.
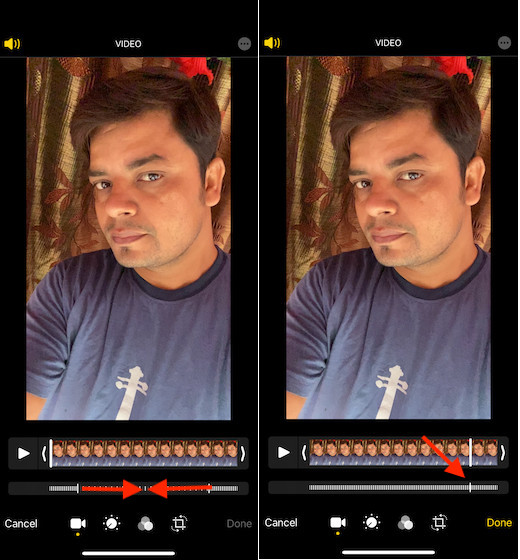
10. Convert Slow Motion Video to Normal Video
The stock photos app features a neat slow-motion video converter tool. So, if you ever wished to check how one of your favorite slow-motion videos would appear as a normal video, open it in the Photos app. Then, tap on the Edit button. After that, tightly place the vertical lines in the slider located at the bottom.
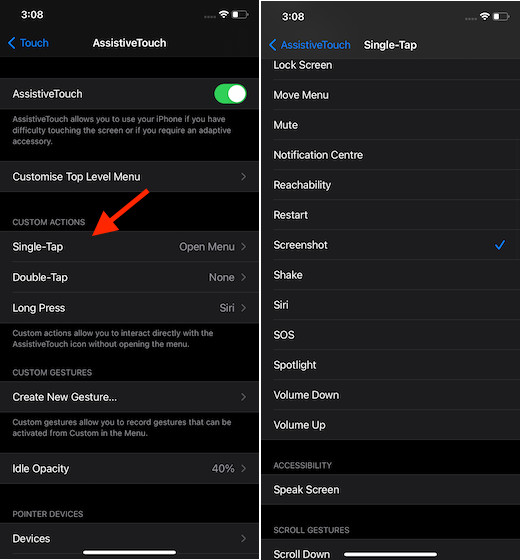
11. Capture Screenshot Without Using Buttons
Thanks to Accessibility, you can capture screenshots on your device without having to use the volume buttons. Go to Settings app -> Accessibility -> Touch > AssistiveTouch. Now, make sure the AssistiveTouch switch is enabled. After that, choose Screenshot in the Single-Tap (custom action) section. From now onwards, all you need to snap the screen is just tap on the AssistiveTouch button.
12. Use Your iPhone as Magnifying Glass
One of the lesser-known Accessibility features is the Magnifier which allows you to use your device camera to magnify your surroundings. If you are yet to unravel it, go to Settings app -> Accessibility -> Magnifier and then turn on the toggle for it. To use it like a pro, follow this extensive guide.
iPhone Security and Privacy Tips
When the conversation is about enhancing the overall iOS experience through pro tips, it would be out and out injustice to leave out the galaxy of security and privacy features that Apple has rolled out in iOS 14. And if I were to talk about all of them in this post, it could seem like a never-ending story.
Features like the ability to restrict third-party access to Photos app and Local Network as well as the options to enable Private MAC address, and get the detailed Safari privacy report have made iOS 14/iPadOS far more secure and private. So, if you want to double down on security and privacy, explore this comprehensive guide.
Over 40 Hidden iPhone Tips and Tricks at Your Disposal
There you go! So, these are the super cool hidden iOS tips and tricks that can help you get the most out of your iPhone and iPad. From productivity to customization to security/privacy, it has got you fully covered.
Have I missed out on some iPhone hacks worth mentioning in this lineup? If yes, be sure to remind me of them. I might consider giving the worthy ones a shot in this article.
![]()


![]()
